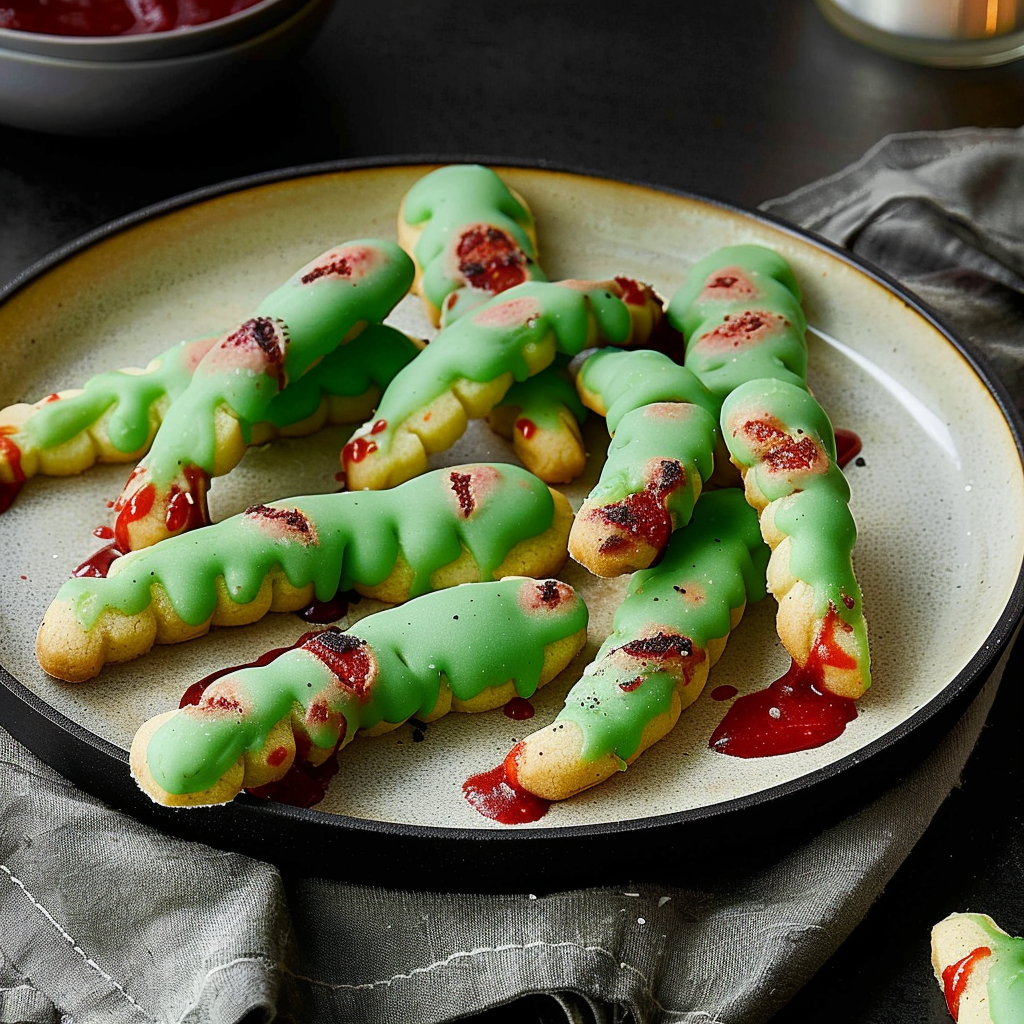
Halloween is creeping around the corner, and nothing says “spooky” quite like Halloween Dessert Zombie Finger Sugar Cookies. Imagine biting into a soft, chewy cookie that looks like it just crawled out of a grave—complete with realistic finger details that will have your guests shrieking in delight (or horror). These cookies are the perfect blend of sweet, buttery flavor with a dash of frightful fun, making them an ideal treat for any Halloween gathering or haunted house party.
I remember the first time I baked these ghoulish goodies with my kids. We were all giggles and flour clouds, crafting zombie fingers that were more entertaining than frightening. The kitchen smelled heavenly as we mixed the dough, ensuring each “finger” had its own unique personality. Whether you’re hosting a spooky soirée or simply want to share some eerie treats with friends, these cookies promise a delicious experience that will leave you and your guests begging for more.
Why You'll Love This Recipe
- These Halloween Dessert Zombie Finger Sugar Cookies are easy to make, making them perfect for bakers of all levels.
- The combination of flavors creates an irresistible treat that balances sweetness with a hint of almond.
- Their visually striking appearance will wow your guests at any Halloween event.
- Plus, you can customize them for other occasions by changing the decorations!
Ingredients for Halloween Dessert Zombie Finger Sugar Cookies
Here’s what you’ll need to make this delicious dish:
-
All-Purpose Flour: This forms the base of our cookies; sifted flour ensures lightness and an airy texture.
-
Granulated Sugar: Provides sweetness and helps achieve that delightful crispiness on the edges.
-
Butter: Use unsalted butter for richness; let it soften at room temperature for easier mixing.
-
Eggs: These act as binding agents; they also contribute moisture and richness to the cookies.
-
Almond Extract: A splash adds a distinct flavor reminiscent of marzipan, enhancing the cookie’s overall taste.
-
Baking Powder: This leavening agent ensures your cookies rise beautifully while remaining soft and chewy.
-
Green Food Coloring: Use this to give your zombie fingers their creepy color; adjust to your preferred shade.
-
Sliced Almonds: Perfect for creating those eerie fingernails; they add both crunch and visual effect!
The full ingredients list, including measurements, is provided in the recipe card directly below.
How to Make Halloween Dessert Zombie Finger Sugar Cookies
Follow these simple steps to prepare this delicious dish:
Step 1: Preheat Your Oven
Preheat your oven to 350°F (175°C). Line two baking sheets with parchment paper to prevent sticking while baking those creepy fingers.
Step 2: Prepare the Dough
In a large bowl, cream together softened butter and granulated sugar until light and fluffy. Add eggs one at a time, mixing well after each addition. Stir in almond extract and green food coloring until evenly blended.
Step 3: Combine Dry Ingredients
In another bowl, whisk together all-purpose flour and baking powder. Gradually add this dry mixture into the wet ingredients until well combined. Don’t be afraid to get your hands in there!
Step 4: Shape Zombie Fingers
Using about two tablespoons of dough per cookie, roll them into finger shapes—think long and spooky! Press sliced almonds onto one end of each cookie to create nail beds.
Step 5: Bake Your Cookies
Place shaped dough onto prepared baking sheets, spacing them about two inches apart. Bake in preheated oven for about 12-15 minutes or until lightly golden around the edges.
Step 6: Cool and Serve
Remove from oven and let cool on trays for five minutes before transferring them to wire racks. Once cooled completely, serve these hauntingly delicious treats at your next Halloween bash!
Transfer to plates and watch as everyone giggles (and gasps) at your creative culinary concoction! Enjoy every spooky bite!
You Must Know
- These Halloween Dessert Zombie Finger Sugar Cookies are not only spooky but also deliciously fun.
- They’re perfect for Halloween parties, school events, or just to scare your friends a little.
- With a little creativity, you can make these creepy cookies a hit this season!
Perfecting the Cooking Process
Start by preheating your oven and preparing your cookie dough. Once the dough is ready, shape it into fingers and place them on a baking sheet. While they bake, prepare your icing and decorations for maximum efficiency and minimal mess.
Add Your Touch
Feel free to swap out almond extract for vanilla if you’re not a fan of almonds. You can also mix in colorful sprinkles or even add chocolate chips for an extra treat. Get creative with the icing colors to match your Halloween theme!
Storing & Reheating
Store these zombie finger cookies in an airtight container at room temperature for up to a week. If you want to keep them longer, pop them in the freezer—just remember to let them thaw before serving!
Chef's Helpful Tips
- Use cold butter for the perfect texture; it helps create a softer cookie that’s easier to mold into finger shapes.
- Don’t skip chilling the dough; it prevents spreading during baking and keeps your spooky shapes intact.
- Experiment with food coloring in your icing for more vibrant zombie fingers!
I remember the first time I made these cookies for a Halloween party. My friends were both horrified and delighted, and they devoured every last crumb. It was such a hit that I’ve been making them every year since!
FAQs:
What are Halloween Dessert Zombie Finger Sugar Cookies?
Halloween Dessert Zombie Finger Sugar Cookies are fun, spooky treats made to resemble zombie fingers. These cookies are typically soft, sweet, and decorated with green icing and almond slices to mimic fingernails. Ideal for Halloween parties, they combine creativity with deliciousness, making them a favorite among kids and adults alike.
How can I make my Halloween Dessert Zombie Finger Sugar Cookies more appealing?
To enhance the visual appeal of your Halloween Dessert Zombie Finger Sugar Cookies, consider using edible glitter or colorful sprinkles. Additionally, incorporating different shades of green for the icing can create a more realistic zombie appearance. Using food coloring creatively will help these cookies stand out at any Halloween gathering.
Can I store leftover Halloween Dessert Zombie Finger Sugar Cookies?
Yes, you can store leftover Halloween Dessert Zombie Finger Sugar Cookies. Place them in an airtight container at room temperature for up to one week. For longer storage, consider freezing them. Wrap each cookie individually in plastic wrap before placing them in a freezer-safe container. This way, you can enjoy these spooky treats even after Halloween!
What other decorations can I use for my Halloween Dessert Zombie Finger Sugar Cookies?
In addition to almond slices for fingernails, you can use candy eyes or chocolate chips for added decoration on your Halloween Dessert Zombie Finger Sugar Cookies. Incorporating red gel icing to simulate blood or adding crushed graham crackers to mimic dirt can also enhance the spooky effect. Let your creativity shine!
Conclusion for Halloween Dessert Zombie Finger Sugar Cookies:
In summary, Halloween Dessert Zombie Finger Sugar Cookies offer a unique blend of creativity and taste that makes them perfect for any Halloween celebration. With their eerie appearance and delicious flavor, these cookies are sure to impress guests of all ages. Remember to experiment with different decorations and storage methods to maximize enjoyment. Embrace the spooky season and have fun making these delightful treats!
Halloween Dessert Zombie Finger Sugar Cookies
Halloween Dessert Zombie Finger Sugar Cookies are a frightfully fun treat that will thrill your guests! These soft, chewy cookies resemble creepy zombie fingers, complete with almond “nails” for an extra spooky touch. Perfect for Halloween parties or festive gatherings, they combine a rich buttery flavor with a hint of almond, making them utterly irresistible. Get ready to impress friends and family with this creative twist on classic sugar cookies!
- Prep Time: 20 minutes
- Cook Time: 15 minutes
- Total Time: 35 minutes
- Yield: About 24 cookies 1x
- Category: Dessert
- Method: Baking
- Cuisine: American
Ingredients
- 2 ¾ cups all-purpose flour
- 1 cup granulated sugar
- 1 cup unsalted butter (softened)
- 2 large eggs
- 1 tsp almond extract
- 1 tsp baking powder
- 1 tbsp green food coloring
- ½ cup sliced almonds
Instructions
- Preheat your oven to 350°F (175°C) and line two baking sheets with parchment paper.
- In a large bowl, cream together the softened butter and granulated sugar until light and fluffy. Add the eggs one at a time, mixing well after each addition. Stir in the almond extract and green food coloring until combined.
- In another bowl, whisk together the flour and baking powder. Gradually add the dry mixture into the wet ingredients until fully incorporated.
- Shape about two tablespoons of dough into long finger shapes; press sliced almonds onto one end for nails.
- Place cookies on the prepared baking sheets, spacing them two inches apart. Bake for 12-15 minutes or until lightly golden around the edges.
- Allow cookies to cool on trays for five minutes before transferring them to wire racks.
Nutrition
- Serving Size: 1 cookie (30g)
- Calories: 150
- Sugar: 8g
- Sodium: 80mg
- Fat: 7g
- Saturated Fat: 4g
- Unsaturated Fat: 2g
- Trans Fat: 0g
- Carbohydrates: 21g
- Fiber: <1g
- Protein: 2g
- Cholesterol: 30mg
Keywords: - For added flavor variation, substitute almond extract with vanilla extract. - Decorate with edible glitter or colorful sprinkles for extra flair. - Store cookies in an airtight container at room temperature for up to one week.


