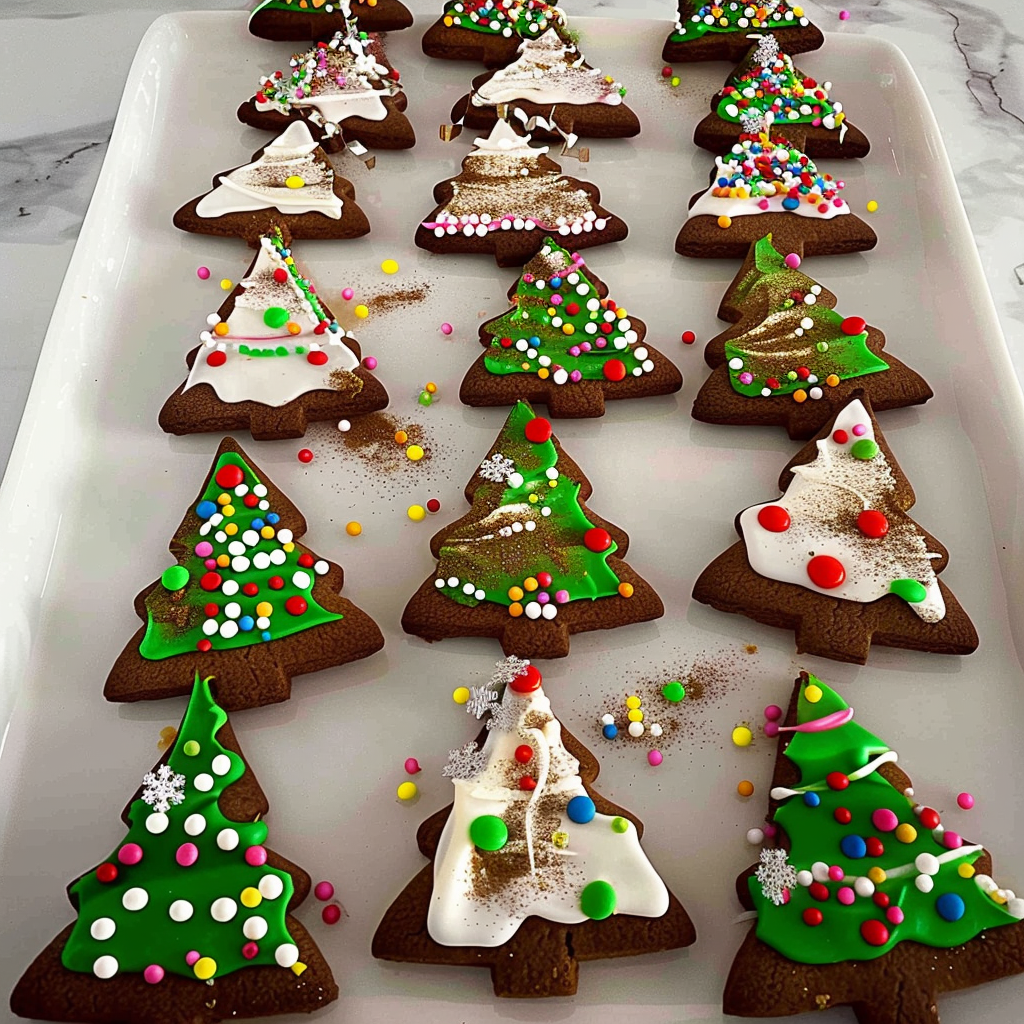
Christmas Tree Cookies are the festive treats that turn every holiday gathering into a winter wonderland. Imagine soft, buttery cookies shaped like iconic Christmas trees, adorned with vibrant icing and sprinkles that sparkle like freshly fallen snow. The aroma of vanilla and almond wafts through your kitchen, enticing everyone to come closer and indulge in these delightful creations.
These cookies aren’t just sweet; they are a canvas for creativity and nostalgia. Whether you’re decorating them with your kids or surprising your friends at the annual holiday party, each bite is a reminder of joyful celebrations and cherished moments. The anticipation of tasting these delicious treats makes the holiday season even more special.
Why You'll Love This Christmas Tree Cookies
- These delightful Christmas Tree Cookies transform simple ingredients into a festive masterpiece that captivates everyone around.
- The straightforward recipe ensures even beginner bakers can achieve impressive results effortlessly.
- Their stunning visual appeal brightens any holiday table, making them perfect for sharing on social media.
- Adaptable for various dietary preferences, these cookies fit seamlessly into any festive gathering or cozy family night in.
Last year, my family gathered around the table, flour flying everywhere as we attempted to decorate our Christmas Tree Cookies. Laughter echoed through the house as frosting ended up on noses instead of cookies.
Essential Ingredients
Here’s what you’ll need to make this delicious dish:
-
All-Purpose Flour: Essential for structure; use a good quality flour for the best texture.
-
Baking Powder: This will help your cookies rise perfectly without becoming cake-like.
-
Unsalted Butter: Softened butter creates that melt-in-your-mouth effect—don’t substitute with margarine.
-
Granulated Sugar: Sweetens your cookies; it’s essential for that classic cookie sweetness.
-
Eggs: One large egg provides moisture and binds your ingredients together nicely.
-
Vanilla Extract: Adds a warm, comforting flavor that complements the sweetness perfectly.
-
Almond Extract: A touch of almond enhances the flavor profile beautifully; don’t skip it!
-
Icing Sugar: For decorating; you can mix this with food coloring for fun designs!
-
Sprinkles: Because what’s a Christmas tree without some colorful decorations?
The full ingredients list, including measurements, is provided in the recipe card directly below.
How to Make Christmas Tree Cookies
Prepare Your Dough: Preheat oven to 350°F (175°C) and line baking sheets with parchment paper. In a bowl, beat softened butter and granulated sugar until creamy and fluffy.
Add Wet Ingredients: Mix in eggs, vanilla extract, and almond extract until well combined. The mixture should look smooth and silky—like liquid gold!
Combine Dry Ingredients: In another bowl, whisk together flour and baking powder. Gradually add this dry mix to the wet mixture while stirring until just combined—avoid overmixing for tender cookies.
Chill Your Dough: Cover the dough with plastic wrap and refrigerate for about 30 minutes. Chilling helps prevent spreading during baking—a little patience goes a long way here!
Cut Out Cookies: Roll out chilled dough on a floured surface to about 1/4 inch thick. Use a tree-shaped cookie cutter to create festive shapes—find one that’s as quirky as your personality!
Bake & Cool: Place cutouts on prepared baking sheets and bake for 8-10 minutes until edges are lightly golden. Let them cool completely before decorating—this prevents icing from sliding off like an uninvited guest at a holiday party!
Now you’re armed with everything you need to create stunning Christmas Tree Cookies that will dazzle friends and family alike! Enjoy the process as much as the delicious outcome!
You Must Know About Christmas Tree Cookies
- This showstopping Christmas Tree Cookies delivers restaurant-quality results using simple ingredients you probably already have at home.
- The perfect balance of textures and flavors creates an unforgettable dining experience that will have everyone asking for seconds.
- Picture-perfect presentation with vibrant colors makes this dish absolutely Instagram-worthy and guaranteed to impress any dinner guest.
- Incredibly versatile recipe that works beautifully for weeknight dinners, meal prep, special occasions, or even outdoor entertaining sessions.
Perfecting the Cooking Process
Start by creaming butter and sugar together until fluffy, then add eggs and vanilla. Sift flour and baking powder together in a separate bowl before combining everything. Chilling the dough for at least an hour keeps your cookies from spreading too much while baking. Roll out the dough to about a quarter-inch thickness, then use tree-shaped cookie cutters for festive fun!
Add Your Touch
Feel free to swap out traditional frosting for royal icing or melted chocolate if you’re feeling adventurous. Add colorful sprinkles or edible glitter on top for that extra holiday sparkle! You can even incorporate flavors like peppermint extract or almond essence to give these cookies a unique twist that reflects your personal style.
Storing & Reheating
Store your Christmas Tree Cookies in an airtight container at room temperature for up to one week. For longer storage, freeze them in a single layer on a baking sheet before transferring to a zip-lock bag—this helps prevent breakage. When ready to enjoy, allow them to thaw at room temperature before serving; they taste best fresh!
Chef's Helpful Tips for Christmas Tree Cookies
- This professional-quality Christmas Tree Cookies relies on precise timing and temperature control to achieve restaurant-standard results consistently.
- Master the art of mise en place by prepping all ingredients beforehand, ensuring smooth execution and preventing any last-minute cooking disasters.
- The secret lies in layering flavors throughout the cooking process rather than seasoning only at the end for maximum depth.
- Tip let the finished dish rest for optimal texture and flavor development before serving to hungry guests waiting eagerly.
The first time I made these cookies, my friends couldn’t believe their eyes! They were convinced I had hired a professional baker because they looked so impressive yet tasted like pure bliss.
FAQ
What are Christmas Tree Cookies?
Christmas Tree Cookies are festive sugar cookies shaped like Christmas trees, usually decorated with icing and sprinkles. They capture the essence of holiday cheer and make great gifts too! Use colorful decorations to create unique designs that reflect your personal holiday spirit.
Can I make these cookies gluten-free?
Absolutely! Simply substitute regular flour with a gluten-free blend designed for baking. Ensure all other ingredients are also gluten-free to avoid cross-contamination. The flavor and texture will still be delightful!
How do I decorate my Christmas Tree Cookies?
Get creative! Use royal icing or melted chocolate as a base, then add sprinkles, colored sugar, or edible glitter to enhance their festive look. You can even pipe on designs if you’re feeling artistic!
Can I freeze Christmas Tree Cookies?
Yes, you can freeze them! Just ensure they are completely cooled before wrapping them tightly in plastic wrap or storing them in an airtight container. They can last up to three months frozen without losing their deliciousness.
Conclusion for Christmas Tree Cookies
Christmas Tree Cookies are not just treats; they’re memories waiting to be created! With their delightful taste and charming appearance, these cookies bring joy to every holiday gathering. Remember to personalize your recipe with fun decorations and flavors while following expert tips for perfect results every time. So roll up those sleeves, gather your loved ones, and enjoy some festive baking magic!
Christmas Tree Cookies
Celebrate the holiday season with these charming Christmas Tree Cookies! Soft, buttery, and perfectly decorated, these festive treats are a delightful canvas for creativity. With their vibrant icing and colorful sprinkles, they bring joy to any gathering. Whether you’re baking with family or impressing friends at a holiday party, these cookies are sure to spark fond memories and sweet moments.
- Prep Time: 30 minutes
- Cook Time: 10 minutes
- Total Time: 40 minutes
- Yield: Approximately 24 cookies 1x
- Category: Dessert
- Method: Baking
- Cuisine: Holiday
Ingredients
- 2 ½ cups all-purpose flour
- 1 tsp baking powder
- 1 cup unsalted butter, softened
- 1 cup granulated sugar
- 1 large egg
- 2 tsp vanilla extract
- 1 tsp almond extract
- 3 cups icing sugar (for decoration)
- Sprinkles (for decoration)
Instructions
- Preheat oven to 350°F (175°C) and line baking sheets with parchment paper.
- In a large bowl, cream together softened butter and granulated sugar until light and fluffy.
- Add the egg, vanilla extract, and almond extract; mix until smooth.
- In another bowl, whisk together flour and baking powder. Gradually add the dry mixture to the wet ingredients until just combined. Avoid overmixing for tender cookies.
- Cover the dough with plastic wrap and refrigerate for about 30 minutes to prevent spreading while baking.
- Roll out the chilled dough on a floured surface to about ¼ inch thick and cut into tree shapes using a cookie cutter.
- Place cookies on prepared baking sheets and bake for 8-10 minutes or until edges are lightly golden. Let cool completely before decorating.
Nutrition
- Serving Size: 1 cookie (30g)
- Calories: 150
- Sugar: 10g
- Sodium: 50mg
- Fat: 7g
- Saturated Fat: 4g
- Unsaturated Fat: 2g
- Trans Fat: 0g
- Carbohydrates: 19g
- Fiber: <1g
- Protein: 1g
- Cholesterol: 20mg
Keywords: Feel free to use royal icing or melted chocolate for decorating your cookies for a unique twist! For gluten-free options, substitute regular flour with a gluten-free blend made for baking.


