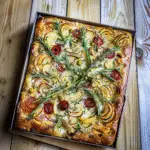
Focaccia art is not just a dish; it’s a canvas for creativity, a fluffy masterpiece that teases your senses with its warm, inviting aroma and golden crust. Picture slicing into the bread, only to be greeted by an explosion of herbs and olive oil that dances on your palate, making each bite feel like an artistic revelation.
Now imagine hosting a gathering where your focaccia art steals the show, leaving guests raving about your culinary prowess. This delightful bread can elevate any occasion, from cozy family dinners to lively brunches with friends. Get ready to experience flavors and textures that will have everyone clamoring for seconds.
Why You'll Love This Focaccia Art
- This incredible Focaccia Art transforms simple everyday ingredients into restaurant-quality flavors that will blow your mind completely.
- Foolproof recipe techniques guarantee perfect results every single time, making even novice cooks feel like professional chefs instantly.
- Stunning visual appeal with gorgeous colors and mouthwatering aromas creates the ultimate Instagram-worthy dish for any special occasion.
- Endlessly adaptable for different dietary needs while working beautifully for meal prep, date nights, or entertaining large groups effortlessly.
Every time I serve this dish, my family can’t help but applaud my “culinary genius,” which usually involves me flinging flour around the kitchen like a flour tornado.
Essential Ingredients
Here’s what you’ll need to make this delicious dish:
-
All-Purpose Flour: The backbone of focaccia; choose a high-quality brand for best results.
-
Yeast: Use active dry yeast for a light and airy texture; check expiration dates!
-
Warm Water: About 110°F (43°C) is ideal to activate the yeast without cooking it.
-
Salt: A must-have ingredient to enhance flavor; use sea salt if possible.
-
Olive Oil: Choose extra virgin olive oil for its rich flavor; drizzle generously over the dough.
-
Fresh Herbs: Rosemary or thyme work wonders; fresh herbs yield vibrant flavors.
-
Toppings of Choice: From olives to cherry tomatoes, let your creativity shine with fun toppings.
The full ingredients list, including measurements, is provided in the recipe card directly below.
How to Make Focaccia Art
Activate the Yeast: In a small bowl, mix warm water with sugar and sprinkle yeast on top. Let it sit until bubbly—about 5-10 minutes—indicating it’s alive and kicking.
Mix the Dough: In a large mixing bowl, combine flour and salt. Create a well in the center and pour in the activated yeast mixture along with olive oil. Stir until combined.
Knead It Out: Transfer dough onto a floured surface and knead for 8-10 minutes until smooth and elastic. Feel free to channel your inner baker here!
First Rise Time!: Place the kneaded dough in an oiled bowl. Cover it with a damp cloth and let it rise in a warm spot until doubled in size—about 1-2 hours, depending on warmth.
Create Your Masterpiece: Once risen, punch down the dough gently to release air bubbles. Spread it onto a greased baking sheet using your fingers to create dimples across its surface.
Add Toppings & Final Rise: Drizzle more olive oil over the top and sprinkle fresh herbs along with any other toppings you desire. Let it rise again for about 30 minutes while preheating your oven to 425°F (220°C).
Baking this focaccia art is not just about technique; it’s about embracing creativity!
You Must Know About Focaccia Art
- This showstopping Focaccia Art delivers restaurant-quality results using simple ingredients you probably already have at home.
- The perfect balance of textures and flavors creates an unforgettable dining experience that will have everyone asking for seconds.
- Picture-perfect presentation with vibrant colors makes this dish absolutely Instagram-worthy and guaranteed to impress any dinner guest.
- Incredibly versatile recipe that works beautifully for weeknight dinners, meal prep, special occasions, or even outdoor entertaining sessions.
Perfecting the Cooking Process
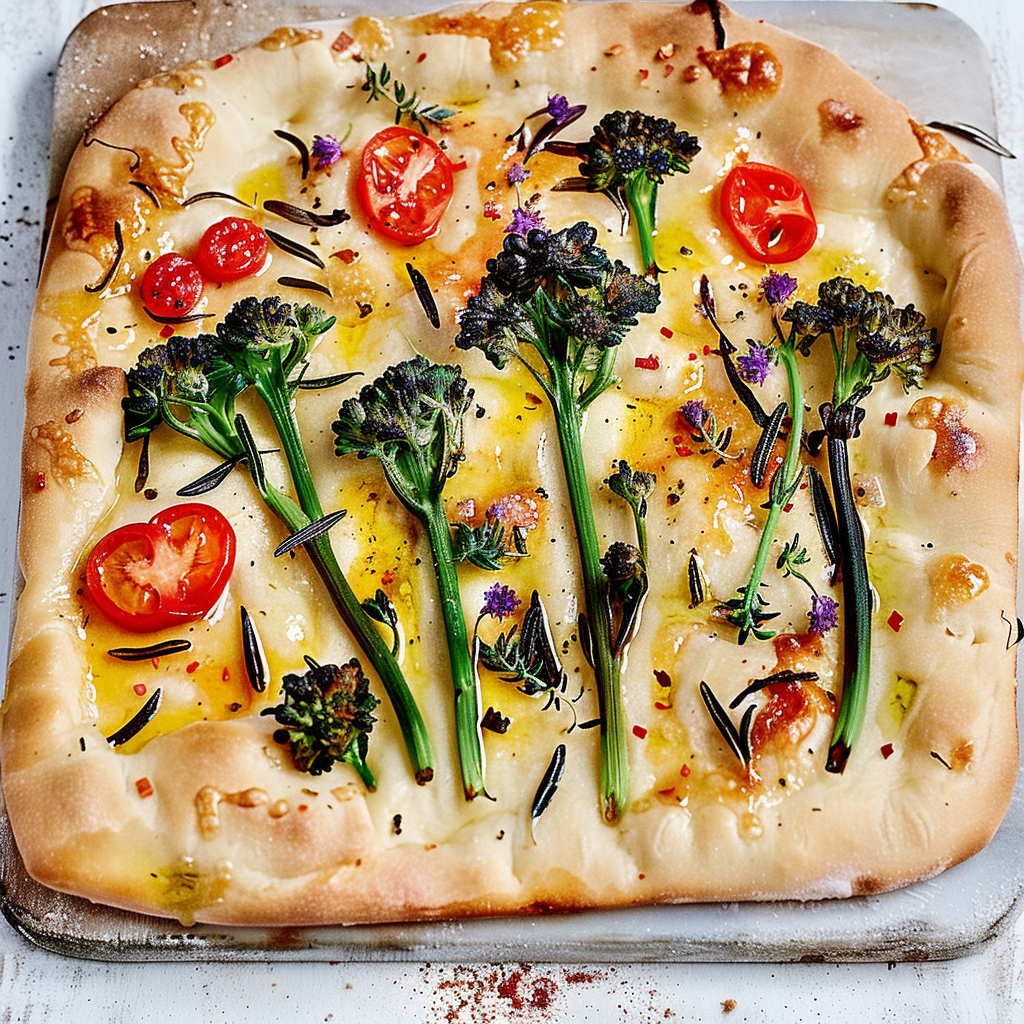
To achieve the ultimate Focaccia Art, start by preparing your dough, letting it rise while you prep your toppings. Once risen, gently stretch the dough onto a baking tray, then create dimples before adding your colorful veggies. Bake at 400°F for about 20-25 minutes until golden brown and fragrant.
Add Your Touch
Feel free to customize your Focaccia Art by swapping in seasonal vegetables or herbs you love. You can also experiment with different oils or cheeses to make it uniquely yours. A sprinkle of sea salt on top elevates the flavors and adds a delightful crunch.
Storing & Reheating
To store leftover Focaccia Art, place it in an airtight container at room temperature for up to two days. For longer storage, refrigerate it for up to a week. To reheat, simply pop it back in a preheated oven at 350°F for 10 minutes to restore its crispy texture.
Chef's Helpful Tips for Focaccia Art
- This professional-quality Focaccia Art relies on precise timing and temperature control to achieve restaurant-standard results consistently.
- Master the art of mise en place by prepping all ingredients beforehand, ensuring smooth execution and preventing any last-minute cooking disasters.
- The secret lies in layering flavors throughout the cooking process rather than seasoning only at the end for maximum depth.
- Tip let the finished dish rest for optimal texture and flavor development before serving to hungry guests waiting eagerly.
It was during a family gathering when my cousin tasted my first attempt at Focaccia Art; her eyes lit up as she exclaimed it was better than pizza! That moment sparked my passion for creating beautiful edible masterpieces.
FAQ
What makes Focaccia Art unique?
Focaccia Art stands out because it’s not just bread; it’s a canvas! The vibrant vegetables create beautiful patterns and designs that turn this classic Italian dish into an eye-catching centerpiece. This creativity invites you to infuse personal flair into your culinary creations, making every loaf unique.
Can I use gluten-free flour for this recipe?
Absolutely! You can substitute regular flour with gluten-free blends specifically made for bread. Just remember that texture might vary slightly, so keep an eye on rising times and adjust liquids as needed for optimal results.
How long does it take to make Focaccia Art from start to finish?
Making Focaccia Art generally takes around 3 hours from start to finish, including rising time for the dough. However, most of that time is hands-off while the dough rises beautifully, allowing you ample opportunity to sip coffee or binge-watch your favorite show!
Can I freeze my Focaccia Art?
Yes! To freeze your Focaccia Art, wrap it tightly in plastic wrap and then in aluminum foil before placing it in a freezer-safe bag. When you’re ready to enjoy it again, thaw overnight in the refrigerator and reheat as described earlier.
Conclusion for Focaccia Art
In conclusion, creating stunning Focaccia Art is a delightful way to express your culinary creativity while savoring delectable flavors. With simple ingredients and customizable options, anyone can craft this beautiful dish that doubles as art and food. Remember to follow key tips like proper rising times and experimenting with various toppings to make each creation uniquely yours! Enjoy every bite of your masterpiece!
Focaccia Art
Focaccia Art is a delightful and visually stunning bread that doubles as a creative canvas for your culinary imagination. With its golden crust, fluffy texture, and aromatic herbs, this dish will wow your guests at any gathering. Perfect for family dinners or brunch with friends, Focaccia Art transforms simple ingredients into a restaurant-quality masterpiece that everyone will love. Get ready to elevate your cooking game and impress with this Instagram-worthy creation!
- Prep Time: 15 minutes
- Cook Time: 25 minutes
- Total Time: 40 minutes
- Yield: Approximately 12 servings 1x
- Category: Bread
- Method: Baking
- Cuisine: Italian
Ingredients
- 4 cups all-purpose flour
- 1 packet (2 ¼ tsp) active dry yeast
- 1 ½ cups warm water (110°F/43°C)
- 2 tsp sea salt
- ¼ cup extra virgin olive oil (plus more for drizzling)
- 2 tbsp fresh rosemary or thyme
- Assorted toppings (e.g., olives, cherry tomatoes)
Instructions
- Activate the yeast by mixing warm water with sugar in a bowl and sprinkling yeast on top. Let sit for 5-10 minutes until bubbly.
- In a large bowl, combine flour and salt. Create a well, pour in the yeast mixture and olive oil, then stir until combined.
- Knead dough on a floured surface for 8-10 minutes until smooth.
- Place the dough in an oiled bowl, cover with a damp cloth, and let rise in a warm area for 1-2 hours until doubled in size.
- Punch down the dough, stretch onto a greased baking sheet, make dimples on the surface.
- Drizzle with olive oil and sprinkle fresh herbs and toppings. Let rise for another 30 minutes while preheating oven to 425°F (220°C).
- Bake for 20-25 minutes until golden brown.
Nutrition
- Serving Size: 1 slice (75g)
- Calories: 180
- Sugar: 0g
- Sodium: 250mg
- Fat: 6g
- Saturated Fat: 1g
- Unsaturated Fat: 4g
- Trans Fat: 0g
- Carbohydrates: 28g
- Fiber: 1g
- Protein: 5g
- Cholesterol: 0mg
Keywords: Feel free to adapt the recipe with seasonal veggies or different cheeses to suit your taste. For added flavor, sprinkle sea salt on top before baking.

